Android TV gets a new superb feature
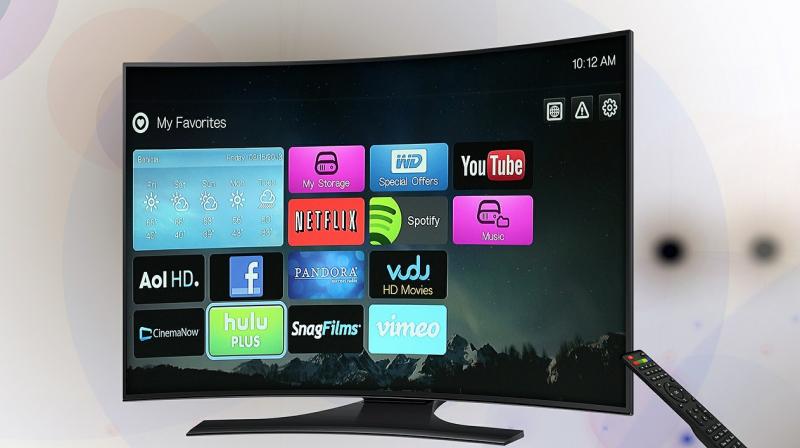
All TVs have the same problem with keyboard input: It is very cumbersome to hunt and peck for each letter using a D-pad with a remote. And if you make a mistake, trying to correct it compounds the problem.
APIs like Smart Lock and Autofill, can ease user's frustrations, but for certain types of input, like login, you need to collect complex input that is difficult for users using the on-screen keyboard.
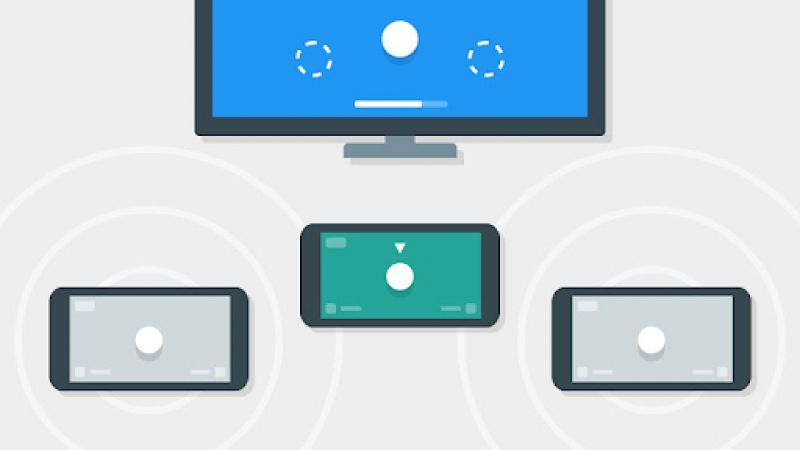
With the Nearby Connections API, you can use a second screen to gather input from the user with less friction.
How Nearby Connections works
From the documentation:
"Nearby Connections is an offline peer-to-peer socket model for communication based on advertising and discovering devices in proximity.
Usage of the API falls into two phases: pre-connection, and post-connection.
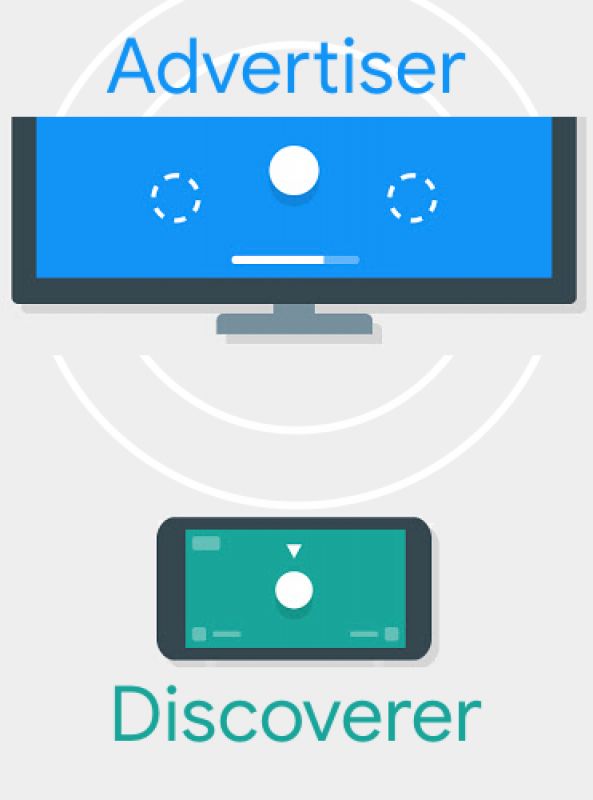
In the pre-connection phase, Advertisers advertise themselves, while Discoverers discover nearby Advertisers and send connection requests. A connection request from a Discoverer to an Advertiser initiates a symmetric authentication flow that results in both sides independently accepting (or rejecting) the connection request.
After a connection request is accepted by both sides, the connection is established and the devices enter the post-connection phase, during which both sides can exchange data."
In most cases the TV is the advertiser and the phone is the discoverer. In the example below, the assumed second device is a phone. The API and patterns described in this article are not limited to a phone. For example, a tablet could also be the second screen device.
Login Example
There are many times when keyboard input is required. Authenticating users and collecting billing information (like zip codes and name on card) are common cases. This example handles a login flow that uses a second screen to see how Nearby Connections can help reduce friction.
1. The user opens your app on her TV and needs to login. You can show a screen of options similar to the setup flow for a new TV.
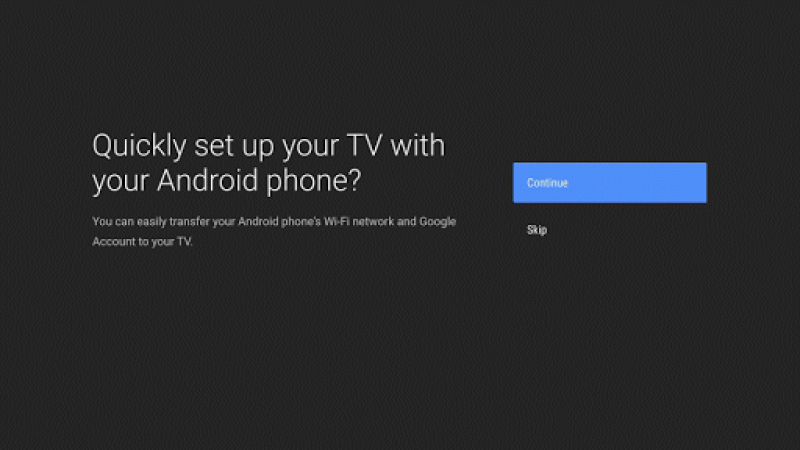
2. After the user chooses to login with their phone, the TV should start advertising and send the user to the associated login app on their phone, which should start discovering. There are a variety of solutions to open the app on the phone. As an example, Android TV's setup flow has the user open the corresponding app on their mobile device. Initiating the hand-off is a more a UX concern than a technology concern.
3. The phone app should display the advertising TV and prompt the user to initiate the connection. After the (encrypted -- see Security Considerations below for more on this) connection is established the TV can stop advertising and the phone can stop discovering.
"Advertising/Discovery using Nearby Connections for hours on end can affect a device's battery. While this is not usually an issue for a plugged-in TV, it can be for mobile devices, so be conscious about stopping advertising and discovery once they're no longer needed."
4. Next, the phone can start collecting the user's input. Once the user enters their login information, the phone should send it to the TV in a BYTES payload over the secure connection.
5. When the TV receives the message it should send an ACK (using a BYTES payload) back to the phone to confirm delivery.
6. When the phone receives the ACK, it can safely close the connection.
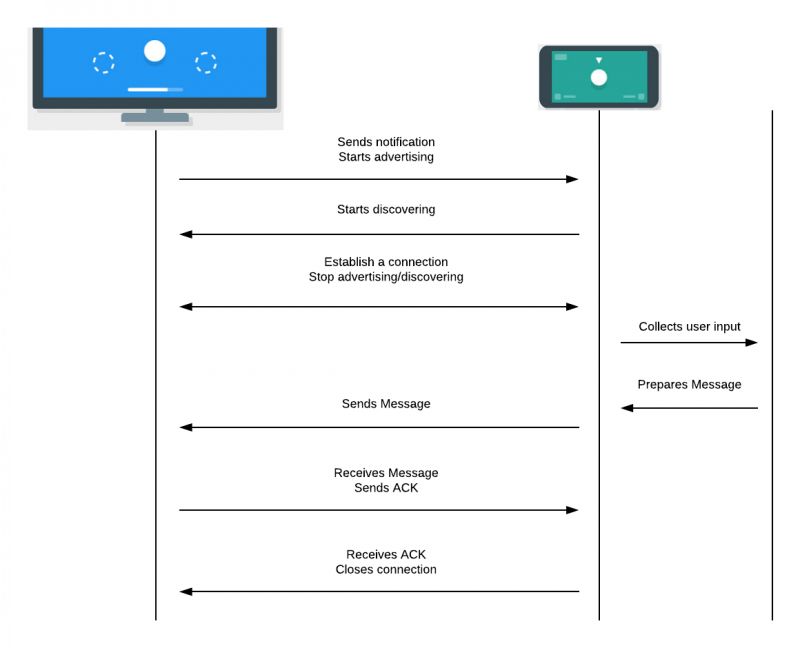
The following diagram summarizes the sequence of events:
UX considerations
Nearby Connections needs location permissions to be able to discover nearby devices. Be transparent with your users. Tell them why they need to grant the location permission on their phone.
Since the TV is advertising, it does not need location permissions.
Start advertising: The TV code
After the user chooses to login on the phone, the TV should start advertising. This is a very simple process with the Nearby API.
When the user clicks a button, update the UI to tell them to look at their phone to continue. Be sure to offer a way to cancel the remote login and try manually with the cumbersome onscreen keyboard.
This example uses a GuidedStepFragment but the same UX pattern applies to whatever design you choose.
Advertising is straightforward. You need to supply a name, a service id (typically the package name), and a 'ConnectionLifeCycleCallback'.
You also need to choose a strategy that both the TV and the phone use. Since it is possible that the users has multiple TVs (living room, bedroom, etc) the best strategy to use is P2P_CLUSTER.
Then start advertising. The onSuccessListener and onFailureListener tell you whether or not the device was able to start advertising, they do not indicate a device has been discovered.
fun doStartAdvertising(context: Context) {
Nearby.getConnectionsClient(context).startAdvertising(
context.getString(R.string.tv_name),
context.packageName,
connectionLifecycleCallback,
AdvertisingOptions.Builder().setStrategy(Strategy.P2P_CLUSTER).build()
)
.addOnSuccessListener {
Log.d(LoginStepFragment.TAG, "We are advertising!")
}
.addOnFailureListener {
Log.d(LoginStepFragment.TAG, "We cannot start advertising.")
Toast.makeText(
context, "We cannot start advertising.", Toast.LENGTH_LONG)
.show()
}
}
The real magic happens in the 'connectionLifecycleCallback' that is triggered when devices start to initiate a connection. The TV should accept the handshake from the phone (after performing the necessary authentication -- see Security Considerations below for more) and supply a payload listener.
val connectionLifecycleCallback = object : ConnectionLifecycleCallback() {
override fun onConnectionInitiated(
endpointId: String,
connectionInfo: ConnectionInfo
) {
Log.d(TAG, "Connection initialized to endpoint: $endpointId")
// Make sure to authenticate using 'connectionInfo.authenticationToken'
// before accepting
Nearby.getConnectionsClient(context)
.acceptConnection(endpointId, payloadCallback)
}
override fun onConnectionResult(
endpointId: String,
connectionResolution: ConnectionResolution
) {
Log.d(TAG, "Received result from connection: ${connectionResolution.status.statusCode}")
doStopAdvertising()
when (connectionResolution.status.statusCode) {
ConnectionsStatusCodes.STATUS_OK -> {
Log.d(TAG, "Connected to endpoint: $endpointId")
otherDeviceEndpointId = endpointId
}
else -> {
otherDeviceEndpointId = null
}
}
}
override fun onDisconnected(endpointId: String) {
Log.d(TAG, "Disconnected from endpoint: $endpointId")
otherDeviceEndpointId = null
}
}
The payloadCallback listens for the phone to send the login information needed. After receiving the login information, the connection is no longer needed. We go into more detail later in the Ending the Conversation section.
Discovering the big screen: The phone code
Nearby Connections does not require the user's consent. However, the location permission must be granted in order for discovery with Nearby Connections to work its magic. (It uses BLE scanning under the covers.)
After opening the app on the phone, start by prompting the user for location permission if not already granted on devices running Marshmallow and higher.
Once the permission is granted, start discovering, confirm the connection, collect the credentials, and send a message to the TV app.
Discovering is as simple as advertising. You need a service id (typically the package name -- this should be the same on the Discoverer and Advertiser for them to see each other), a name, and a 'EndpointDiscoveryCallback'. Similar to the TV code, the flow is triggered by callbacks based on the connection status.
Nearby.getConnectionsClient(context).startDiscovery(
context.packageName,
mobileEndpointDiscoveryCallback,
DiscoveryOptions.Builder().setStrategy(Strategy.P2P_CLUSTER).build()
)
.addOnSuccessListener {
// We're discovering!
Log.d(TAG, "We are discovering!")
}
.addOnFailureListener {
// We were unable to start discovering.
Log.d(TAG, "We cannot start discovering!")
}
The Discoverer's listeners are similar to the Advertiser's success and failure listeners; they signal if the request to start discovery was successful or not.
Once you discover an advertiser, the 'EndpointDiscoveryCallback' is triggered. You need to keep track of the other endpoint to know who to send the payload, e.g.: the user's credentials, to later.
val mobileEndpointDiscoveryCallback = object : EndpointDiscoveryCallback() {
override fun onEndpointFound(
endpointId: String,
discoveredEndpointInfo: DiscoveredEndpointInfo
) {
// An endpoint was found!
Log.d(TAG, "An endpoint was found, ${discoveredEndpointInfo.endpointName}")
Nearby.getConnectionsClient(context)
.requestConnection(
context.getString(R.string.phone_name),
endpointId,
connectionLifecycleCallback)
}
override fun onEndpointLost(endpointId: String) {
// A previously discovered endpoint has gone away.
Log.d(TAG, "An endpoint was lost, $endpointId")
}
}
One of the devices must initiate the connection. Since the Discoverer has a callback for endpoint discovery, it makes sense for the phone to request the connection to the TV.
The phone asks for a connection supplying a 'connectionLifecycleCallback' which is symmetric to the callback in the TV code.
val connectionLifecycleCallback = object : ConnectionLifecycleCallback() {
override fun onConnectionInitiated(
endpointId: String,
connectionInfo: ConnectionInfo
) {
Log.d(TAG, "Connection initialized to endpoint: $endpointId")
// Make sure to authenticate using 'connectionInfo.authenticationToken' before accepting
Nearby.getConnectionsClient(context)
.acceptConnection(endpointId, payloadCallback)
}
override fun onConnectionResult(
endpointId: String,
connectionResolution: ConnectionResolution
) {
Log.d(TAG, "Connection result from endpoint: $endpointId")
when (connectionResolution.status.statusCode) {
ConnectionsStatusCodes.STATUS_OK -> {
Log.d(TAG, "Connected to endpoint: $endpointId")
otherDeviceEndpointId = endpointId
waitingIndicator.visibility = View.GONE
emailInput.editText?.isEnabled = true
passwordInput.editText?.isEnabled = true
Nearby.getConnectionsClient(this).stopDiscovery()
}
else -> {
otherDeviceEndpointId = null
}
}
}
override fun onDisconnected(endpointId: String) {
Log.d(TAG, "Disconnected from endpoint: $endpointId")
otherDeviceEndpointId = null
}
}
Once the connection is established, stop discovery to avoid keeping this battery-intensive operation running longer than needed. The example stops discovery after the connection is established, but it is possible for a user to leave the activity before that happens. Be sure to stop the discovery/advertising in onStop() on both the TV and phone.
override fun onStop() {
super.onStop()
Nearby.getConnectionsClient(this).stopDiscovery()
}
Just like a TV app, when you accept the connection you supply a payload callback. The callback listens for messages from the TV app such as the ACK described above to clean up the connection.
After the devices are connected, the user can use the keyboard and send their authentication information to the TV by calling 'sendPayload()'.
fun sendCreditials() {
val email = emailInput.editText?.text.toString()
val password = passwordInput.editText?.text.toString()
val creds = "$email:$password"
val payload = Payload.fromBytes(creds.toByteArray())
Log.d(TAG, "sending payload: $creds")
if (otherDeviceEndpointId != null) {
Nearby.getConnectionsClient(this)
.sendPayload(otherDeviceEndpointId, payload)
}
}
Ending the conversation
After the phone sends the payload to the TV (and the login is successful), there is no reason for the devices to remain connected. The TV can initiate the disconnection with a simple shutdown protocol.
The TV should send an ACK to the phone after it receives the credential payload.
val payloadCallback = object : PayloadCallback() {
override fun onPayloadReceived(endpointId: String, payload: Payload) {
if (payload.type == Payload.Type.BYTES) {
payload.asBytes()?.let {
val body = String(it)
Log.d(TAG, "A payload was received: $body")
// Validate that this payload contains the login credentials, and process them.
val ack = Payload.fromBytes(ACK_PAYLOAD.toByteArray())
Nearby.getConnectionsClient(context).sendPayload(endpointId, ack)
}
}
}
override fun onPayloadTransferUpdate(
endpointId: String,
update: PayloadTransferUpdate
) { }
}
The phone should have a 'PayloadCallback' that initiates a disconnection in response to the ACK. This is also a good time to reset the UI to show an authenticated state.
private val payloadCallback = object : PayloadCallback() {
override fun onPayloadReceived(endpointId: String, payload: Payload) {
if (payload.type == Payload.Type.BYTES) {
payload.asBytes()?.let {
val body = String(it)
Log.d(TAG, "A payload was received: $body")
if (body == ACK_PAYLOAD) {
waitingIndicator.visibility = View.VISIBLE
waitingIndicator.text = getString(R.string.login_successful)
emailInput.editText?.isEnabled = false
passwordInput.editText?.isEnabled = false
loginButton.isEnabled = false
Nearby.getConnectionsClient(this@MainActivity)
.disconnectFromEndpoint(endpointId)
}
}
}
}
override fun onPayloadTransferUpdate(
endpointId: String,
update: PayloadTransferUpdate
) { }
}
Security considerations
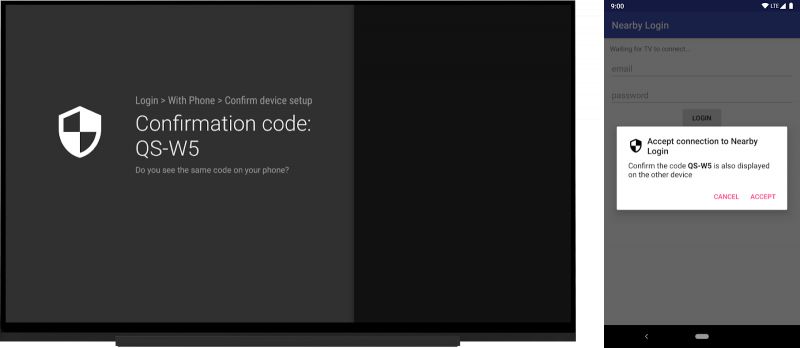
For security (especially since we're sending over sensitive information like login credentials), it's strongly recommended that you authenticate the connection by showing a code and having the user confirm that the two devices being connected are the intended ones -- without this, the connection established by Nearby Connection is encrypted but not authenticated, and that's susceptible to Man-In-The-Middle attacks. The documentation goes into greater detail on how to authenticate a connection.
Does your app offer a second screen experience?
There are many times when a user needs to supply input to a TV app. The Nearby API provides a way to offload the hardships of an onscreen-dpad-driven keyboard to an easy and familiar phone keyboard.
What use cases do you have where a second screen would simplify your user's life?
Source: Android Developer Blog

